
SEDY ENGINEERING
CO
DESIGN | SIMULATION | CONSULTATION
Sustainable engineering solutions for an emerging global economy.
Sedy Engineering CO is commited to finding solutions to engineering problems in struggling communities. We believe that being part of a global community means that our solutions shouldn't come at a cost to our neighbors' way of life.

Construction Process
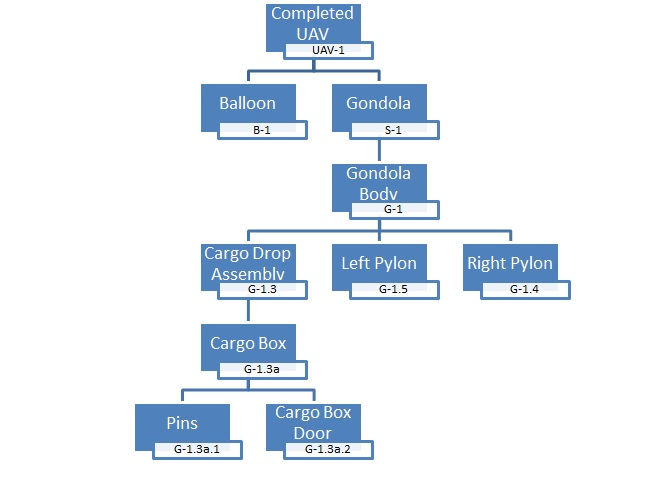
-Gondola and subcomponents fabricated using uPrint 3D printers
-An assembly made up of three main parts and one sub assembly - the base, two detachable motor pylons, and the cargo drop subassembly that interfaces with the gondola
-Pylons and Cargo Drop Assembly attach to the gondola via friction fits
-Cargo Drop door attaches to the container by means of a plastic nub on each door that fits securely in an indentation in the cargo box
-Servo is fastened to the interior wall of the cargo box using small bolts
-Motors are pressed into receptacles and bolted in
-Switches are mounted to the gondola using included screws
-Receiver, motor controllers, and batteries are not restrained within the gondola
Manufacturing Issues
-Friction fits between gondola and pylons too tight
-Externally mounted switches desired after Gondola was printed
-No place for motor leads to enter the gondola
-Servo would not fit into cargo drop box because there was not enough clearance for the wire
-Servo arm unable to be adjusted after installation
-Nuts used to mount servo to cargo box were too big
-Motor controller not shipped with proper connectivity hardware
-Motors did not come with mounting hardware, no mounting hardware available locally
-Propeller mounting hole too small
-Propellers too large to fit within safety shroud
Manufacturing Solution
-Dremel tool used to remove small amounts of material
-Dremel tool used to create mounting points
-Small holes drilled under pylons to allow motor leads to pass through body
-Small slot created to allow wires to pass through during installation
-A small hole was created in the cargo box opposite from the servo arm to allow access
-A small amount of material was machined off one side of each nut so they would fit next to the servo
-Connectors were created from blade-style female connectors
-Thin gauge wire used to secure motors in motor receptacles, motor can still be removed if needed
-Hole was machined to 4mm
-Jig was created to allow each propeller to be trimmed precisely